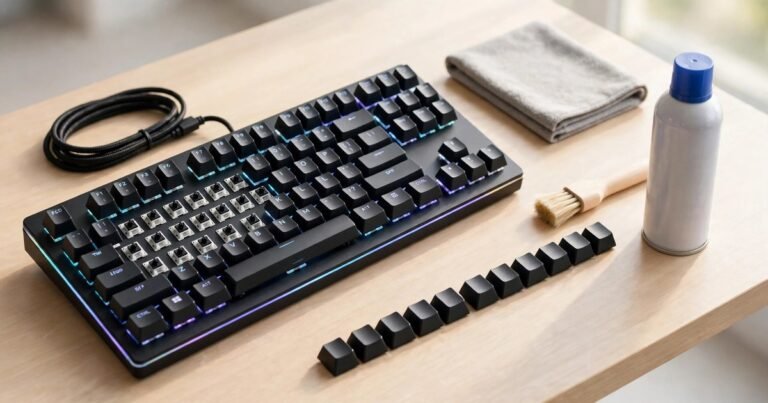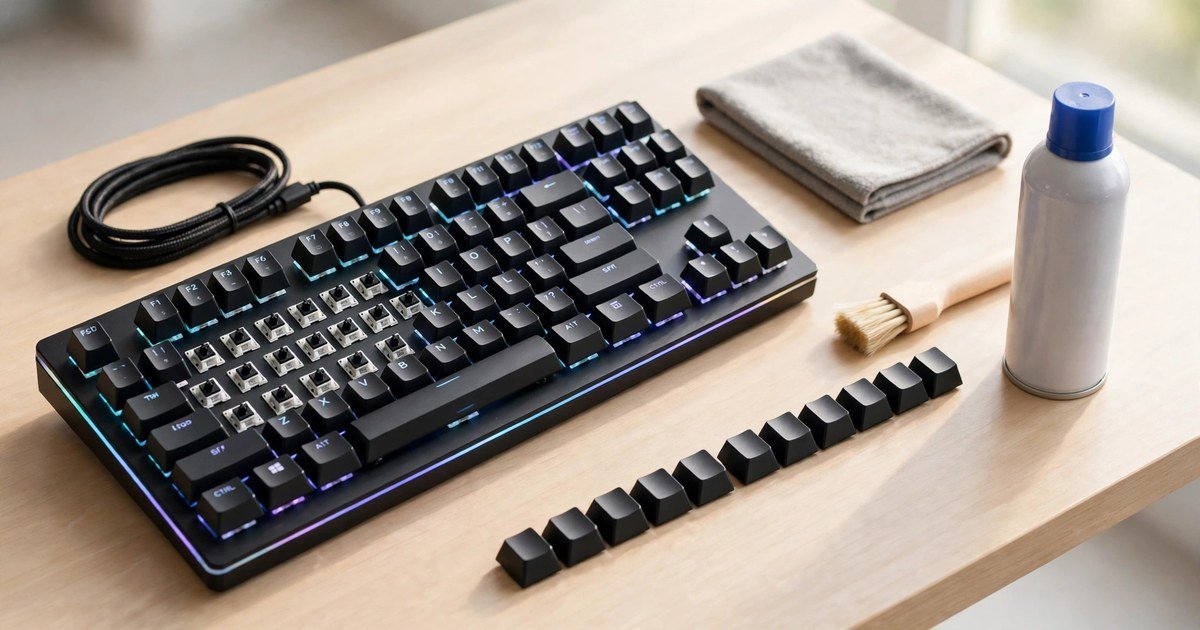
To clean a mechanical gaming keyboard properly, unplug it, remove the keycaps with a keycap puller, soak the caps in warm soapy water, clear dust from the plate with compressed air and a soft brush, wipe around the switches with a lightly dampened cloth, then dry everything fully before you reassemble it. The whole job takes about 30 minutes of active work, plus drying time.
A mechanical keyboard is built to be taken apart and cleaned. Dust, crumbs, hair and finger oils build up between the keys, and over time that grime makes switches feel scratchy and causes keys to stick.
What You Need Before You Start
You need a keycap puller, compressed air with a straw nozzle, a soft-bristle brush, a microfibre cloth, isopropyl alcohol, a bowl, mild dish soap and a clean towel. A wire keycap puller is best because it lifts caps evenly. All of these are easy to find in the UK from Amazon UK, Argos or Currys.
Take a photo of your keyboard layout before you remove anything, so you know where the odd-sized keys go when you put them back. If your keyboard is wireless, switch it off. If it is wired, unplug it. Never clean a keyboard while it is powered on.
Step 1: Remove the Keycaps
Hook the keycap puller under a keycap, squeeze gently and pull straight up. Work row by row, starting with the smaller keys. The spacebar, Enter, Shift and Backspace keys sit on stabilisers, small metal bars that keep them level, so pull these straight up with slow, even pressure. Never yank a stabilised key from one side, or you can bend the bar or crack the cap. Put the removed keycaps in a bowl as you go.
Step 2: Clean the Keycaps
Fill the bowl with lukewarm water and a small drop of mild dish soap. Hot water can warp plastic keycaps. Let the caps soak for 30 minutes to loosen finger oils and grime. Then swish them around, rinse until no soap remains, and lay them on a towel to air dry. Drying usually takes two to three hours. Do not use a dishwasher or a hair dryer.
Step 3: Clean the Plate and Switches
With the keycaps off, turn the keyboard upside down over a bin and give it a gentle shake. Then hold the compressed air can upright, keep it about 10 to 15 centimetres from the board, and blow short bursts at an angle across the rows. Blowing straight down pushes debris deeper into the switches. Holding the can upside down sprays liquid propellant, which you must avoid.
Use the soft brush to sweep hair and dust from around each switch stem and the stabiliser bars. For grime on the plate, dampen a corner of the microfibre cloth with isopropyl alcohol and wipe gently. The cloth should feel damp, never wet. Liquid must never drip into the switches.
Step 4: Fix Sticky Switches and Rattly Stabilisers
If a key feels sticky or slow to return, remove its keycap and put one or two drops of isopropyl alcohol directly into the switch housing. Press the switch 20 to 30 times to work the alcohol through, then let it dry for 10 to 15 minutes. If the key still feels wrong, the switch may be worn, and on a hot-swappable keyboard you can pull it out and fit a replacement.
A rattly spacebar is often caused by dry stabiliser wires. A tiny dab of dielectric grease on the wire ends quiets the rattle. Use very little. Too much lubricant attracts dust and makes the problem worse.
Step 5: Dry, Reassemble and Test
Wait until every keycap is completely dry before you refit them. Press each cap down firmly until it clicks onto the switch stem, checking your layout photo as you go. Once every cap is back, plug the keyboard in and test every key in a text editor. If a key does not register, remove its cap and check that it is seated properly.
Cleaning by Switch Type: Mechanical, Membrane and Optical
The steps above are written for mechanical switches, which have individual switches under each keycap. Caps come off easily and the plate underneath is simple to clean.
Membrane keyboards use a rubber dome sheet under the keys instead of individual switches. Many membrane keycaps do not come off, or they come off only with force that risks breaking the clips. If your board is a membrane model, skip keycap removal and stick to a surface clean with compressed air and a damp cloth.
Optical switches work with a beam of light instead of metal contacts. They are less sensitive to dust inside the switch, but the same cleaning rules apply. Keep liquids away from the switch housings and never open a switch that the manufacturer says is sealed. This switch-type difference is the detail most generic guides skip.
What Never to Do When Cleaning a Keyboard
Never submerge the keyboard in water. Never spray cleaner directly onto the board. Never use bleach, acetone, nail polish remover or abrasive pads, because they cloud or crack plastic and strip keycap legends. Never use a vacuum cleaner directly on the switches, because static electricity can damage the circuit board. And never rush the drying stage.
How Often Should You Clean Your Keyboard?
A quick surface clean every one to two weeks keeps things manageable. Turn the board over, shake out the loose debris, wipe the keycap tops with a dry microfibre cloth and give the gaps a few short bursts of compressed air. A full deep clean with keycap removal every three to six months handles the buildup that surface wipes miss.
Spilled Something on Your Keyboard? Act Fast
Unplug the keyboard immediately and turn it upside down so the liquid drains out. Remove the affected keycaps, blot the area with a dry cloth, and leave the board upside down for at least 30 minutes. Clean the switches with a small amount of isopropyl alcohol, press each affected key several times, and let the board air dry for a full 24 hours before you plug it back in.
Frequently Asked Questions
Can I clean a mechanical keyboard without removing the keycaps?
Yes, for light cleaning. Turn the board upside down, shake out loose debris, use compressed air at an angle between the keys and wipe the keycap tops with a dry microfibre cloth. For a deep clean, you need to remove the keycaps.
What is the best thing to clean keyboard switches with?
Isopropyl alcohol at 90 percent or higher is best for switches because it evaporates quickly and leaves very little water behind. Use one or two drops at a time and let the switch dry fully.
Can I wash mechanical keyboard keycaps in soapy water?
Yes, if the keycaps are removable and your manufacturer allows it. Soak them in lukewarm water with a small drop of mild dish soap for about 30 minutes, rinse well and air dry completely. Never use hot water, a dishwasher or a hair dryer.
How long should a keyboard dry after cleaning?
Keycaps usually need two to three hours to air dry. After a spill, leave the whole keyboard to dry for a full 24 hours before you plug it in.
Does cleaning a keyboard void the warranty?
Normal cleaning with a keycap puller, compressed air and a damp cloth does not void the warranty on most keyboards. Opening the case or desoldering switches can void it. If your keyboard is still under warranty and a switch has failed, contact the manufacturer first.
How do I stop my keyboard getting dirty so fast?
Keep food and drinks away from your desk and wipe the keycap tops with a dry microfibre cloth once a week.
Conclusion
Cleaning a mechanical gaming keyboard properly is a simple job once you know the order: unplug it, remove the keycaps, soak the caps, clear the plate with air and a brush, treat any sticky switches, then dry everything fully before you reassemble it. Check your switch type first, because the method changes slightly for membrane and optical boards. For a full setup refresh, read our guide on how to clean your gaming PC safely, and if you are still choosing a board, see our best budget mechanical keyboard UK guide before you buy.
About the Author